Most people are starting to get in-tune with why they need a home security system. Assurance that your home is a safe haven and a timely intruder alert amongst the many benefits of owning a security camera.
If you are one of these people, you would have probably come most across the term ‘plug-and-play cameras’ during your research. As ambiguous and out-of-the-world as the term might seem, its meaning is pretty easy to comprehend.
What are Plug-and-Play Devices?
Before the introduction of the Plug-and-play (PnP) idea by Microsoft in 1995, computer users generally needed to install a software or driver to make other devices compatible with their computer system. The Plug-and-play eliminates this need.
Plug-and-play devices are easy to set-up devices that are ready for use immediately when connected to computer systems.
Plug-and-Play Thermal Cameras
Thermal cameras most work based on the principle of heat. Our eyes see objects based on the light rays from a light source bounced off these objects. Thermal cameras work by ‘seeing’ the heat energy emitted from objects. Since every object emits some form of heat, no matter how small, thermal cameras would always see these objects irrespective of the illumination of the place.
Luckily, you can have this luxury on your phone. Yeah, on your android phone. the FLIR One for smartphones makes this possible.
FLIR One Analysis
FLIR brings thermal imaging to your fingertips. It morphs complex, computer-based thermal imaging systems into a portable, plug-and-play thermal camera that can be attached to your smartphone.
Design
The FLIR one boasts of flat, rectangular body shape with a 2.7 inches wide and 1.4 inches tall frame. It connects to the bottom of your phone via a 0.3 inches connector that sits in the middle of the top frame. The sides are metallic with a silver pink color, while the top and bottom houses matte-black, plastic panels.
At the bottom, you would find a power button, as well as a USB-C port for charging the camera. It comes with a zip bag; and a USB cable. To have a full charge, it takes up to 40 minutes, which after it can capture thermal images for an hour.
Finally, there are camera lenses. There are two of them. The lenses are located at the back of the camera, one on top of the other. The first is an 80-by-60 resolution sensor that detects heat via infrared radiation. The other is a conventional visual camera with a 1440-by-1080 resolution.
How Does it Work?
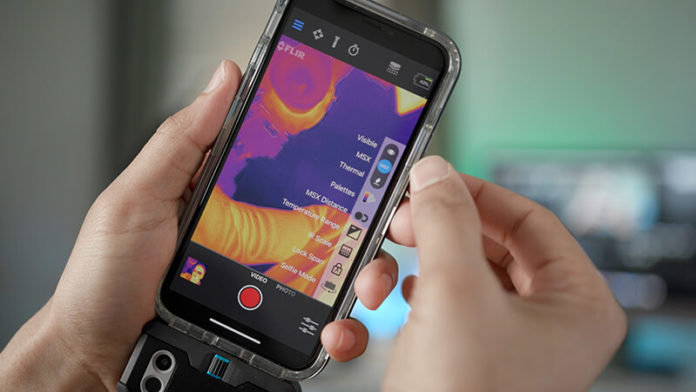
The camera images are accessible via the fee FLIR app. All you’ve got to do is plug in the camera into your phone, then the app is automatically prompted to display a thermal image of wherever the lenses are facing.
On the app, large irregular orange and purple patches are used to slightly conform to the transparent outline of the objects. Since the camera used a low-thermal core resolution, it is complemented by the visual camera to provide more defined images. You do not like the default orange and purple colors? You can choose from a range of eight other colors.
Final Words
Whenever you need a thermal view of objects, pick your FLIR one from the drawer, plug it into your smartphones, and press the big button in the middle of the bottom panel.
Do you want pictures, videos or time-lapse recordings? The FLIR one app works more like other smartphone camera apps, letting you switch between recording modes with a left and right swipe. And yeah, you’ve got everything stored directly to your phones.


